
This Holiday Break dive into a world of colors, shapes, and endless possibilities with these six Fun and Easy DIY Crafts for Kids!
Our crafts are perfect for ages 6-12, with a focus on fun tween-themed useful crafting.
Crafting isn't just about making cool stuff; it's like a brain workout too! It's all about planning, problem-solving, developing fine motor skills (yes, they're still developing into the tweenage years) and turning everyday materials into awesome masterpieces. Plus, when kids see their ideas come to life, it's like a burst of confidence and pride that's contagious. So, grab the glitter, glue, and let the crafting adventures begin...

1. Mosaic Mason Jar Vase or Pencil Cup (watch the video)
You Will Need:
- Coffee Filters
- Watercolor Paint & Brushes
- Craft Scissors
- Glass (or plastic) Mason Jar
- Dishwasher Safe Modge Podge
- Sponge Brush
- Glitter (optional)
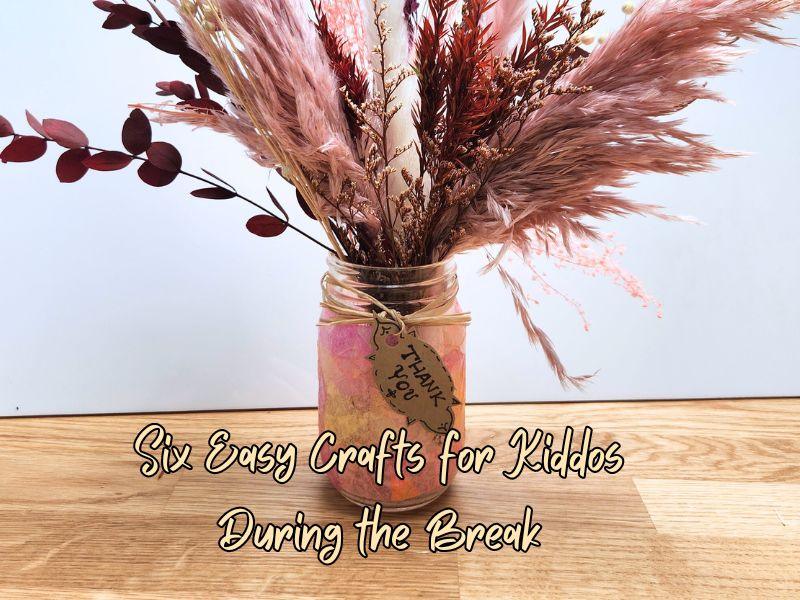
Introducing the DIY Watercolor Mosaic Mason Jar: a charming and creative craft that effortlessly combines artistic expression with functional design. This delightful project takes ordinary coffee filters and a glass jar and transforms them into a mosaic masterpiece! I’ve made this with my 2.5 year old and with my tween students and it’s always a big hit.
Steps:
- Paint three coffee filters with watercolor. I like to use a combination of 3-4 complimentary colors.
- Allow the coffee filters to dry then cut them into squares about 1”x1” (This does not have to be perfect and really any shape will work!)
- Apply Modge Podge to the backs of the coffee filter pieces and affix them to the jar.
- Be sure to overlap and cover the entire jar. (This is my toddler’s favorite part.)
- Apply a layer of modge podge over the top of the coffee filter pieces on the jar.
- Sprinkle with glitter (Totally optional if you’re not a glitter person)
- Allow to dry. The glass can be used as soon as it’s dry however wait two days before putting your jar in the dishwasher.
The final result is a gorgeous jar that works as a drinking glass, a vase, or even a pretty storage jar. Suitable for crafters of all ages, the DIY Watercolor Mosaic Mason Jar invites individuals to unleash their inner artist while embracing the joy of creating something functional and beautiful!

2. No Sew Pencil Case (watch the video)
You Will Need:
- Faux Leather Sheet 9x12
- Two yards of suede string (or yarn)
- Hole Punch
- Scissors
- Optional Stick Velcro
This delightful project empowers kids to explore their creative instincts while crafting a personalized accessory that doubles as a fancy clutch!
Steps:
- Fold the faux leather sheet into thirds so you have a front, back, and a flap.
- Punch holes along the sides through both the front and back. Do not punch holes in the flap. Space holes about half of an inch apart.
- Cut the string in half so that you have two pieces. Fold one piece in half.
- Thread folded end of string through the bottom holes, pull through so you have a loop.
- Thread the ends of the same string through this loop and pull tightly.
- Continue threading the ends of the string through each hole, all the way up the side to the top.
- Tie a knot at the top and cut off any excess string.
- Repeat steps 4-6 on the other side.
- When you reach the top, tie a knot. Instead of cutting off the excess, create a write strap by tying another knot at the end of the strings.
- Add Velcro to the top flap for a closure or, follow the video to see how to create a flap that ties down.
What I love about this craft is that it really helps develop fine motor skills and teaches the essence of sewing without a sewing machine, needle, or thread. With its sleek yet playful design, this no-sew masterpiece doubles as a stylish accessory and a practical storage solution. Whether it's holding pencils, markers, or other treasured art supplies, the pencil case stands as a symbol of creativity and accomplishment.

3. DIY Fancy Feather Pen (watch the video)
You will need:
Steps:
- Wrap washi tape around pen
- Press the tape down to avoid bubbles
- Glue feathers along the top of the pen
- Glue rhinestones or fake flowers over the stems of the feathers.
- Secure ends of washi tape with glue
Elevate your writing experience with our DIY Fancy Feather Pen Craft! This delightful project combines elegance and creativity, and is perfect for your tweenager. Start with a plain ballpoint pen, then choose washi tape. Wrap the pen with the tape all the way up. Next glue fluffy feathers to the top of the pen. Cover the stems with pretty flowers or sparkly rhinestones. The result is a one-of-a-kind writing instrument! This DIY craft is a fantastic way for your child to express their personality and make school feel extra special.

4. Easy DIY Journal (watch the video)
Supplies:
250 Sheets of loose leaf paper
Steps:
- Measure and cut faux leather sheets
- Mark holes and punch three holes onto each faux leather sheet
- Arrange notebook with filler paper between each faux leather sheet
- Attach Binder clips through each hole, making sure it’s through all sheets and the front and back covers.
Get your kids excited about going back to school after break with our DIY Endlessly Refillable Faux Leather Notebook project! This creative and practical craft not only encourages organization but also allows kids to add their personal touch to their school supplies. Using sheets of faux leather, children can craft their own stylish and customizable notebook, which can be refilled time and time again.

5. Pom Pom Fuzzy Monster Backpack Charm (Watch the Video)
Introducing the Fuzzy Monster Backpack Charm – a delightful craft that brings a burst of color and creativity to your child’s backpack. With the playful addition of googly eyes, your child will want to make them for all their friends!
You will need:
- Yarn
- Craft Scissors
- Googly Eyes
- Binder Ring
- Pom Pom Maker or Large Fork
- Jewelry wire (optional - yarn or thread works too)
- Glue gun
Steps:
- Wrap yarn around your fork until it’s very thick and almost ready to slip off.
- Cut a small amount of wire (or extra yarn/thread) and feed it around the center of your yarn, twist loosely a few times.
- Slip the yarn off of the fork.
- Cut all loops around the edges of the yarn.
- Cut a 6 inch piece of yarn and thread it under the wire (this will attach to the binder ring).
- Twist the wire tightly until it’s secure.
- Snip off extra wire.
- Knot the top of the 6” yarn pieces.
- Attach a binder ring.
- Give your pom pom a haircut, round it and cut an area slightly flat for the eyes.
- Glue googly eyes onto your pom pom.
The Fuzzy Monster Backpack Charm isn't just a craft; it's an invitation to creativity. Crafters of all ages can revel in the joy of making their unique monster and telling everyone; “I made this!” Younger children can exercise their motor skills and color recognition, while older kids and even adults can indulge in crafting their own individual statement for a bag or keychain.

6. Luxe Bookmark (watch the video)
Supplies:
Steps:
- Measure and mark off two rectangles 7” high by 2” wide.
- Cut the pieces out from the faux leather
- Glue the pieces together, with right sides facing out.
- Trim edges or shape the bookmark (optional)
- Punch a hole near the center top
- Cut a piece of yarn at least 12” long, wrap it four times and loop through the center hole to create a tassel
Ignite your child's creativity with our Kid-Friendly DIY Faux Leather Print Bookmark project! This delightful and easy craft not only keeps little hands busy but also results in a charming and personalized gift that any book enthusiast will cherish. Using sheets of faux leather in adorable (and chic) prints, kids can unleash their artistic flair and create a special bookmark to give to friends, family, or teachers.